For the first time this year I’ve gotten time to start a building project, outside of the quick shelves we did in The Little Fulla’s cabin. Not long before lockdown I got in a trip to the dump, which is not a usual thing for us, but I had an old broken wooden window to dispose of, plus a big pile of weedmat that I ripped out of the garden and a few other bits and pieces. This large, useless window had been loitering in my potting shed, preventing a proper start to tidying and organising it. I’m so glad I made the effort to get rid of it, for the time of the potting shed project was now.
I forgot to take ‘before’ photos right at the start, so just imagine the first picture below with a whole bunch of large items stuffed into the tall space on the left, without a shelf, with trays or boxes of walnuts and pumpkins perched precariously on top. And much more cardboard sitting in front too.


I began by clearing out everything that had been stored in the large space near the door. There was a support piece of timber across the middle of the dividing wall. Way back after we bought the house, The Husband said he could build me a shelf across there. Almost five years later, I did it myself. It only took one week of lockdown in the end! We don’t have a lot of timber sizes on-hand at the moment, especially in long lengths, so I had to use what we had. I put a support piece on the opposite wall, then cut pieces to fit on top. The piece of timber at the front is slightly higher than the plywood at the back, but I can always change it later on since I used screws to attach them. The plywood was from the old chicken coop I made opposite the old woodshed, and subsequently dismantled during the Demo Project.
Unfortunately, I did not have many 75mm treated wood screws left, so I had to use hefty nails and a hammer to attach the support pieces. I’m not a fan of using the huge nails, even after pre-drilling the holes. They’re a lot of work and it’s harder to dismantle things later on if you want to change something. I have learnt a lesson about keeping a good supply of screws on hand. At least we still have some smaller ones for attaching the shelf tops and I am grateful for the cumbersome nails, otherwise I wouldn’t be able to build much.

I was pretty darn chuffed after I had built this shelf. And then I thought, why not build another one? So I did. But since we didn’t have a lot of long pieces of shelf-width timber and since I wanted to use this shelf mainly for storing pumpkins and squashes and things, which need good airflow, I came up with a different idea. I cut a piece of 150mm wide fence paling timber into three pieces to run along the top and attached wire netting on top of them. I had just enough wire netting left over from fencing the paddock fence to fit in this space. It’s like it was meant to be.


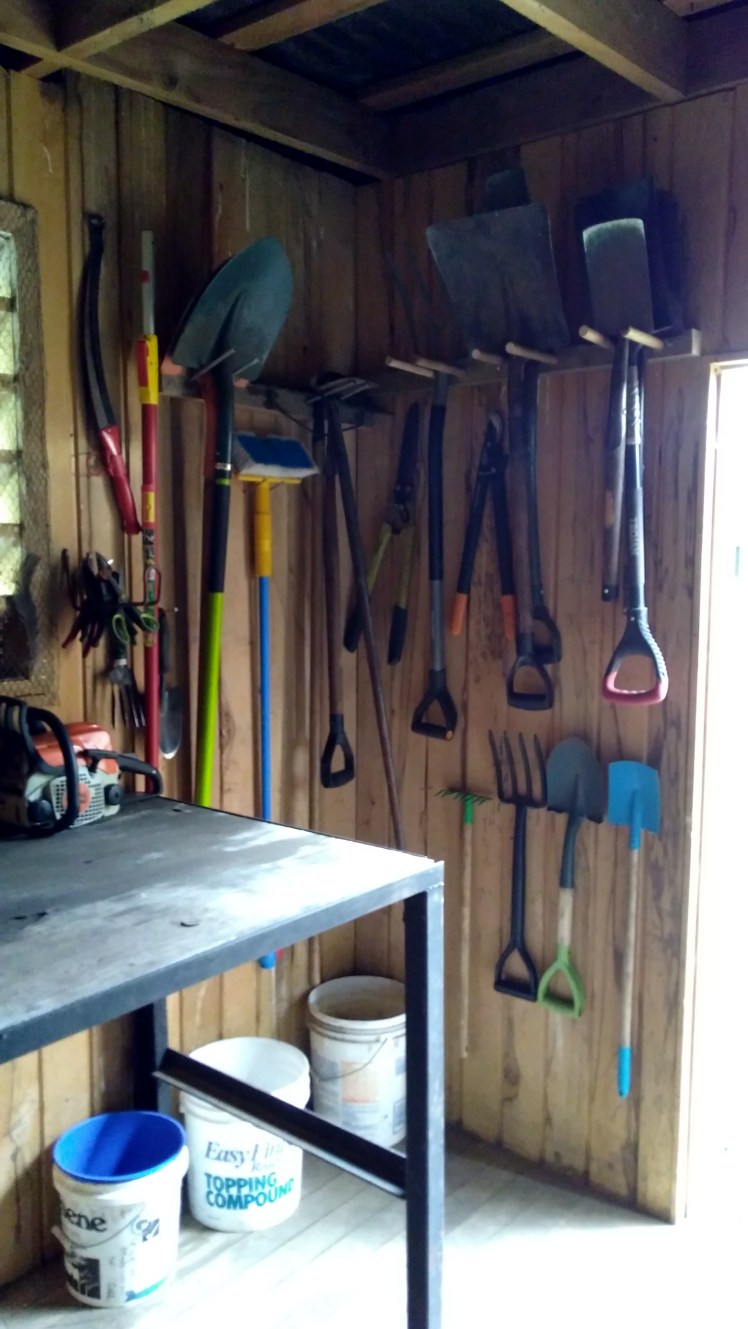
From there, I carried on around the shed, decluttering, sweeping and organising. Then I got to the tools. It was time for a tool storage system. The existing system included nails all over the wall in various places and one piece of timber with four metal rods in it, which were spaced too closely to be of much use. Most of the big garden tools sat on the floor in a mess and the small tools were always falling off the nails they were hung on.
The Husband tried to help out without asking. I came over to find that he had bunged two hex head screws into the wall and had a spade hanging on them. While I tried to be appreciative of his desire to help, I just about had a fit about the illicit holes that had been made in my wall. This was not in the plan. Communication is the key, people.
I made two tool racks, one with the metal rods extracted from the original rack and one with pieces of wooden dowel that I cut. It’s amazing what you can find in the garage sometimes. Even when it’s a horrible mess… I used the tools we had to space out the rods so everything would fit well. Then it was just a matter of drilling a hole and hammering in the rod.

For the smaller tools I put a screw or large nail into the wall where I wanted them to sit. Except for the secateurs and scissors. They got a special metal hanger, which I found lying around in the garage. I did get The Husband to come back and help out with the final shelf: a corner shelf above my potting bench. It isn’t what I was originally going to do there but I found a triangular piece of plywood, so in it went. I can scarcely believe that this is actually my potting shed. It’s soooo nice and tidy, it looks like someone else’s shed! Not that my shed shouldn’t be tidy, but with the males of this household things tend to end up towards the other end of the scale. *Cough* GARAGE.


There’s plenty more that’s been going on here, but the potting shed really deserved a post all to itself. Now every time I open the door there is no more cringing; it makes my heart happy.

The virus has my fiance and myself to really get cracking on projects. It has been a lot of fun and we are surprise what we can accomplish. We even built a huge cupola to put on the back deck.
LikeLiked by 1 person
That’s so cool! It’s a great feeling to create things, isn’t it?
LikeLiked by 1 person
Being creative is great. Just want to get creative and then go out to dinner afterwards again. You take care and keep posting those photos!
LikeLiked by 1 person
It looks amazing and must feel oh-so-good! Do you have issues with critters (ie mice etc) getting to your stored veggies?
LikeLiked by 1 person
Thanks! Yes, it does. One day after I’d finished I turned around to get my gloves off the potting bench and freaked out for a split second thinking, what’s happened to all my stuff?! Haha oh dear.
No issues with stored veggies so far. The main issue we have with rodents is them coming into our house roof and waking us up or making a mess in the garage. The cats help keep them under control and we also use bait/traps.
LikeLiked by 1 person