A lot of small projects have been done in the last few months. So that they don’t miss out on being in the blog, here is a roundup of some of the smaller indoor and outdoor projects that have been going on at Twiglet Homestead.
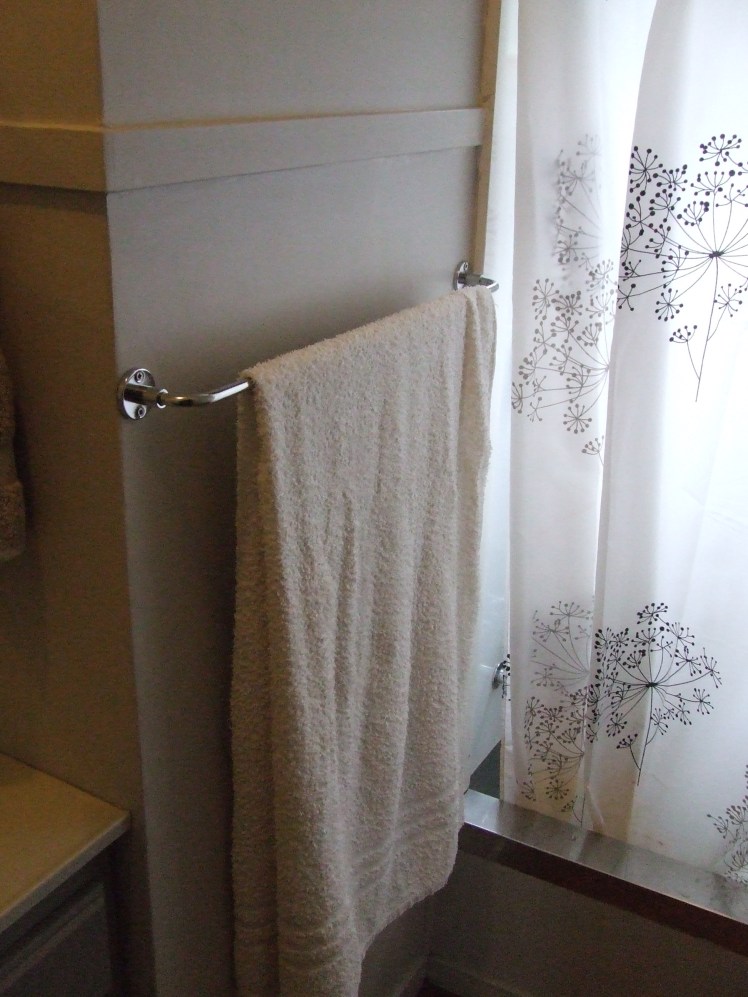
Towel Rail
Our whole bathroom and laundry area needs a BIG renovation. I would love to get my fingers into that, and have my thoughts in it, but we’re not in a position to be able to do it any time soon. Thus, I am sticking to small amendments that make the area more functional. I have installed another towel rail in the bathroom, as we needed more towel rail space, particularly for The Little Fulla’s towel. The rail is a basic 60cm chrome one that just fits into the space where I wanted it: within easy reach of the shower/bath and low enough for The Little Fulla to dry his hands on his towel since he can’t reach the hand towel. The Husband didn’t even notice the new rail until I pointed it out, which I am taking as a good thing: it fits into the bathroom as if it was always there.
Small Shelves
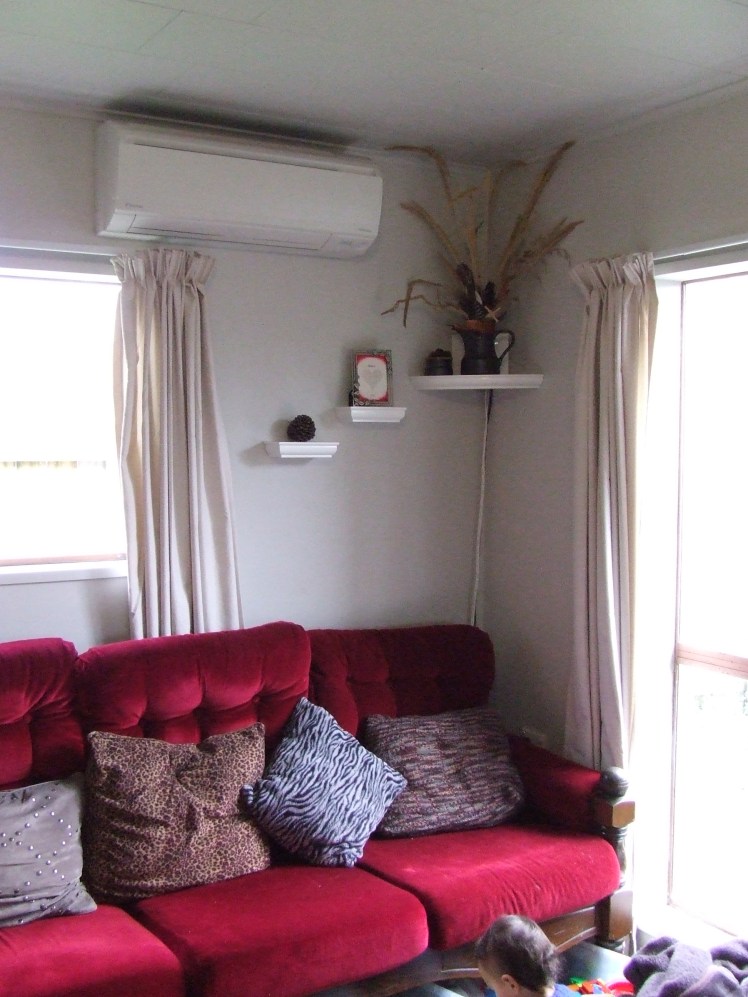
The Husband came home one day with some little shelves, which I wasn’t particularly happy about. First of all, he paid a wad of money for shelves, which I was prepared to make, and, second of all, they were white. I am not a fan of white furniture. I can appreciate it in some other peoples’ houses, but I like natural wood. Rustic is my middle name. Well, it could be. Apparently we desperately needed a corner shelf to sit the Wi-Fi box on so The Little Fulla couldn’t reach it. I suppose I shouldn’t have mentioned the words ‘corner shelf’ to The Husband, even if they were in the same sentence as the word ‘I’, but this all came about because of my great lounge and computer desk-rearranging fiasco of last Christmas, so I suppose The Husband did have a point about how soon I would realistically get time to make something like this…
Anyway, these little white shelves aren’t too bad. It was a set, so, after positioning the corner one for the Wi-Fi box well beyond the reach of The Little Fulla, who has a long reach, I decided what to do with the other four little shelves. The smallest two were positioned near the corner one. Together, they add some interest and volume to that corner of the room, while hopefully detracting some attention from the cords and heat pump, as well as being out of reach of the small, fidgety child. I was allowed to put some ornamental things in front of the Wi-Fi box. I just need to cut some of the seedheads a little shorter and straighten the cords a little more. I suppose the white does brighten up the corner.
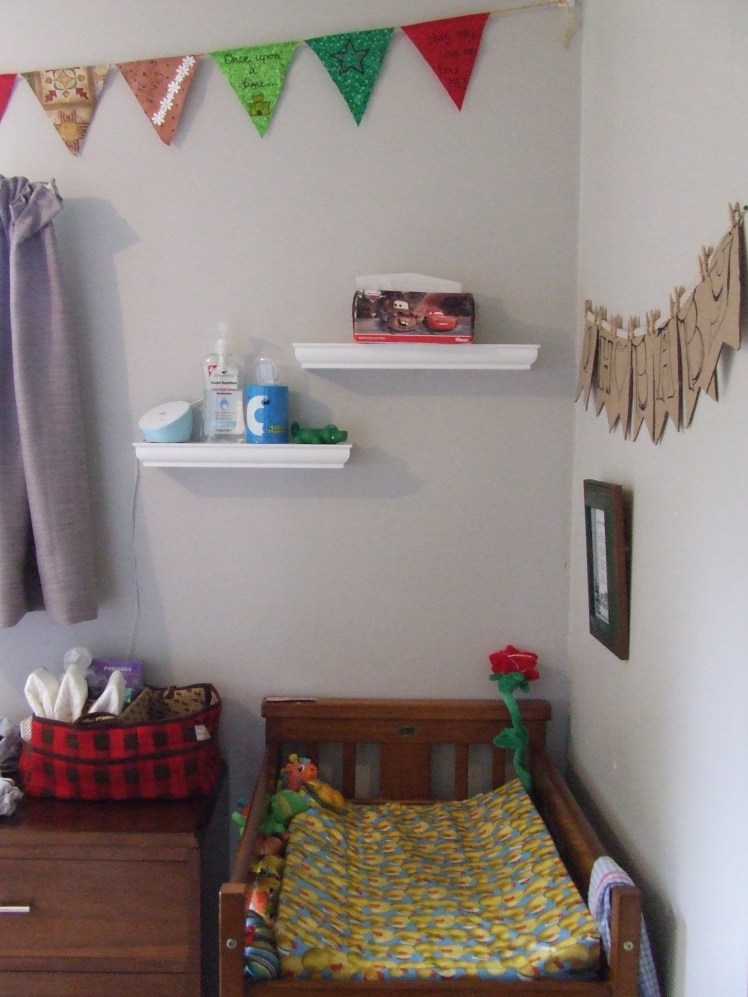
The other two white shelves, which were a little longer, were positioned in The Little Fulla’s room, above the change table, so we could put things up there that he couldn’t reach. Do you sense a theme going on here? I have been wanting some shelving up there for a while, so these will do for now.
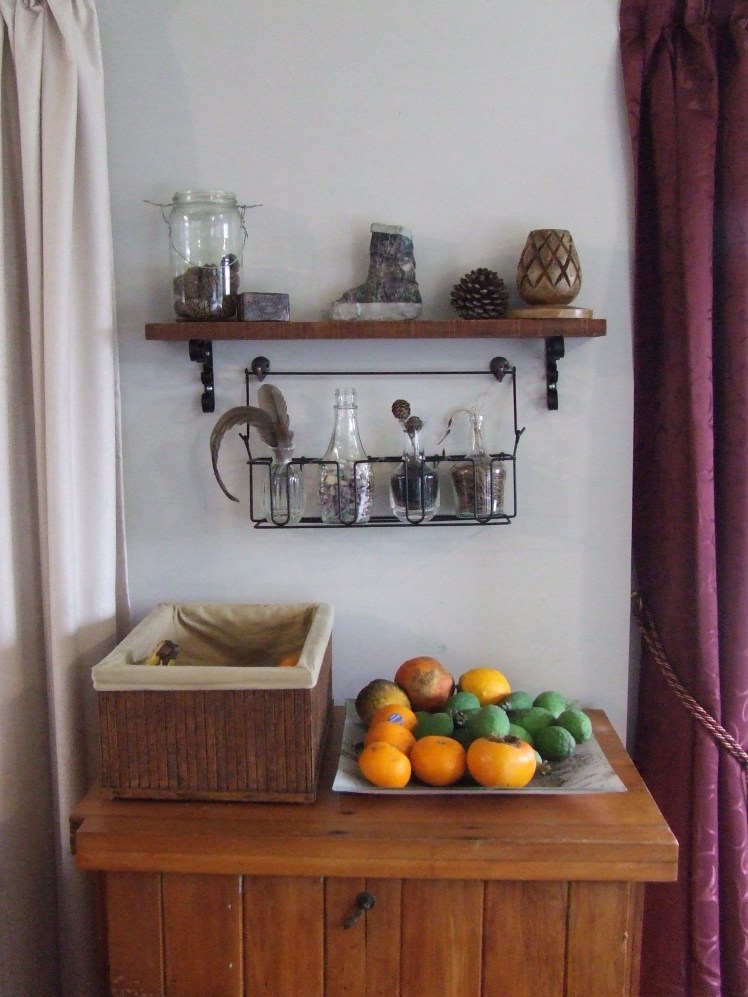
Glass Bottles and Shelf Feature
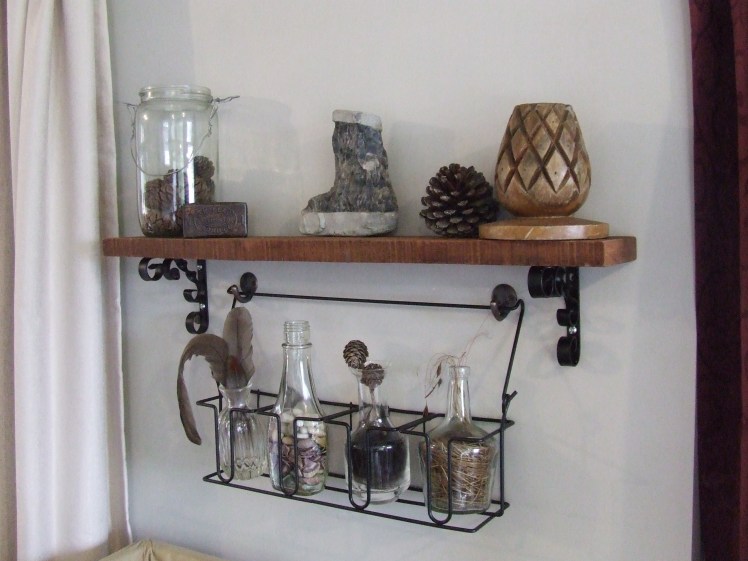
This little project was something creative I came up with. I had a black rack that was a holder for four mason jar drinking glasses, but we never used it to sit the glasses in so it was just taking up space in a cupboard. After acquiring some small, decorative glass bottles or vases left over from The Little Sister-in-law’s wedding, I knew what to do with it. I filled four bottles with curious, found items, bought two hooks and screwed them into the wall above the fruit bowls where there was an empty space yearning to be filled. Some time later… I have just finished the second part of this project: installing a small wooden shelf above it. I found a stained piece of wood in the garage, cut it shorter and roughly sanded it to retain a bit of a rustic look. Then I found some black wall brackets to tie it in with the black rack. I was planning to use the shelf to hold at least some utility things, but it has suddenly filled up with rustic, decorative items, which I am never short of. I know they contribute to a homely atmosphere that makes me feel happy. The Husband likes to call them ‘fluff’.


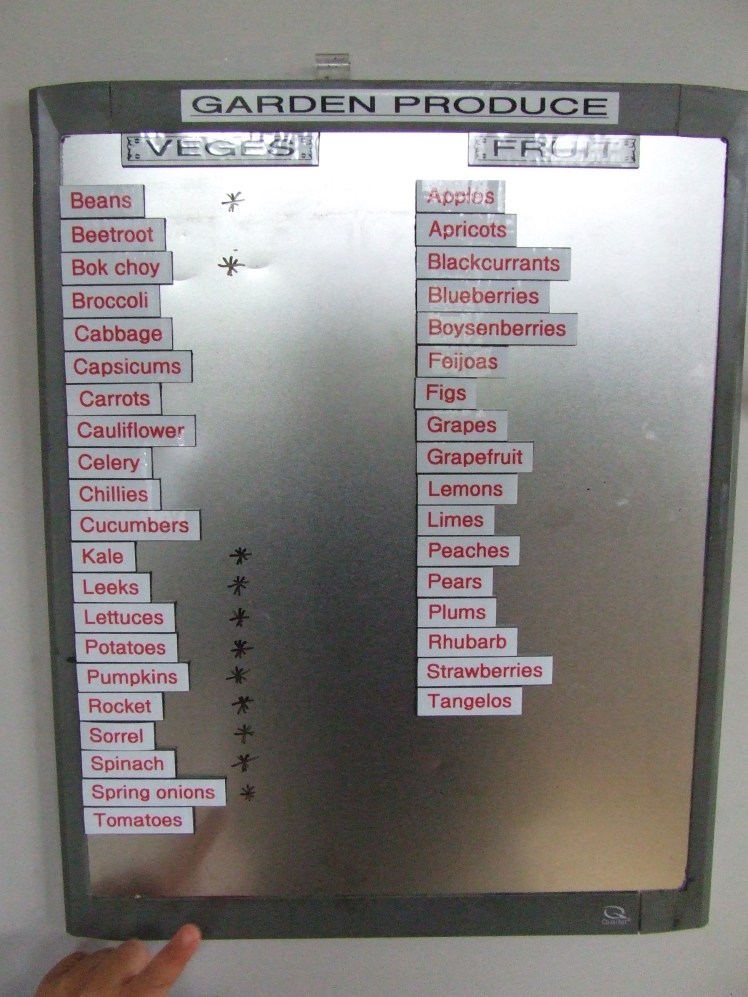
Garden Produce Board
The garden produce board sits on the pantry door and lets us know what veges and fruit are available for use at the current time. In the first version, everything was written on with whiteboard marker. Later crops were added outside of alphabetical order, which was most disturbing to my sense of orderliness. For the new and improved version I used magnetic strips and the label maker to make movable crop labels. Stroke of genius! Now I can keep them all nicely in alphabetical order and can make more if more crops are added. I was looking for small magnetic buttons to put beside crops that are available for eating, but I’ve been drawing a star with whiteboard marker, which is working well.
Rain Barrel Cover
We had a little project session back on Easter Saturday. Well, some of us did: The Father, The Little Brother-in-law and I. The Husband had a sore back and the other females were on a shopping mission. I was happy to be in the yard with tools in my hands. The Father and The Little Brother-in-law began to dig out the last stump in The Herb Garden, but the ground was still soggy and the water table high, so they could only do so much.
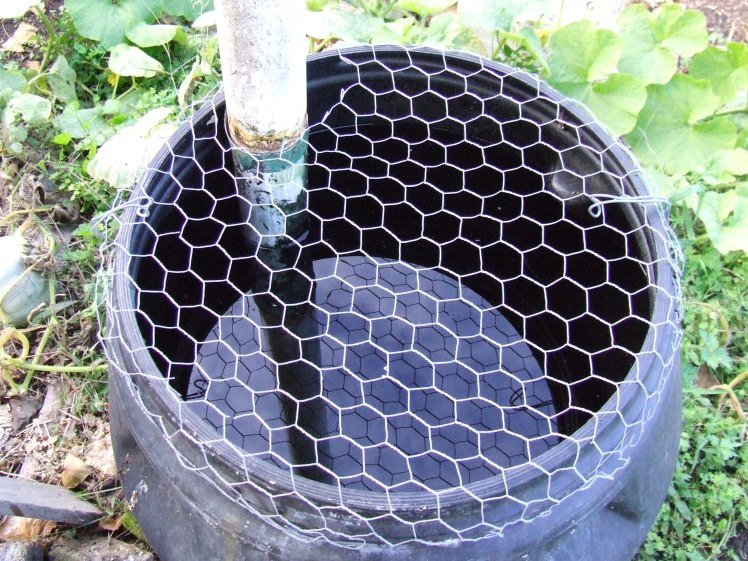
The Little Brother-in-law then took on another project: making a cover for the rain barrel by the carport, which is destined to be moved but needed a cover regardless. The Mother was getting nervous about the prospects of The Little Fulla disappearing into the rain barrel. The Little Brother-in-law made a valiant effort at a plywood cover for the rain barrel with a hole for the downpipe, considering he had very little time to do so. There were several issues with the design though: 1) I couldn’t easily lift it up in order to dip a watering can in the barrel (yes, the barrel should really have a tap instead…), 2) The Little Fulla could push the lid sideways and drink water out of the barrel and 3) The Little Fulla was in danger of pulling the rock off the top of the lid, which was weighing the lid down.
The next day, after The Little Fulla’s water barrel drinking incident, I made version two of the rain barrel lid. Don’t worry, I had to re-do my project from the same day too. My suggestion of wire netting had been pooh-poohed by all but The Father, but I was intent on testing out my idea now. I had a small piece of wire netting leftover from fencing the chicken pen so I made good use of it. First, I fastened some thick wire around the rim of the barrel then fashioned it into a hook facing inside the barrel. I likewise fashioned and attached another wire hook on the other side of the barrel. Then I positioned and trimmed the netting with plenty of overlap for the top of the barrel and to fit around the downpipe, finishing by bending in all the cut ends and bending the wire to fit nicely around the barrel. The wire hooks hook over the cover and can be lifted to take the cover off. It isn’t perfect, but it’s holding up until we can get a proper covered rain barrel.
Chick Food Box
When the little chickens were chicks I had their food container of chick crumbs in the big cage in front of the woodshed, with the door held ajar enough for them to fit in but not the bigger chickens. This ensured that the laying hens wouldn’t get any of the chick food, which contains a coccidiostat. I hooked it up with metal clasps so that I could easily remove the food container and put it in the garage at night. That way the fat, greedy slugs don’t get at it. This was working well. The chicks knew how to get into the cage and they were safe from the big chickens while eating. But the big cage needed to be moved. It was taking up space in one of the precious shelter zones (important in ridiculously wet weather) and it needed to be cleaned and sanitised, ready for other uses if necessary.
I tried using the wooden food box that I had altered for said purpose, but the big chickens could squeeze under it and reach the food. My project for Easter Saturday was to add two vertical planks to the middle of the food box to leave a rectangle or square gap on each side that the big chickens shouldn’t be able to fit through. Well, it was a fail. I watched one of the hens squeeze her front end through one of the gaps and pounce on the chick food. So, while I was in project re-do mode I did version two of this one too. I unattached the two vertical middle planks and one of the horizontal planks from the front of the food box. Then I used the remainder of the piece of chicken wire from the rain barrel cover (how convenient) to cover the front of the food box. I stapled it onto one side then stapled the other end to a sturdy piece of wood that I had cut to the height of the food box, leaving a gap for the chicks to get through. The netting cover hooks onto a couple of nails and can be opened for easy removal of the food vessel. I often saw a fat, greedy slug en route to the food container when I whisked it away for the night. Ha!


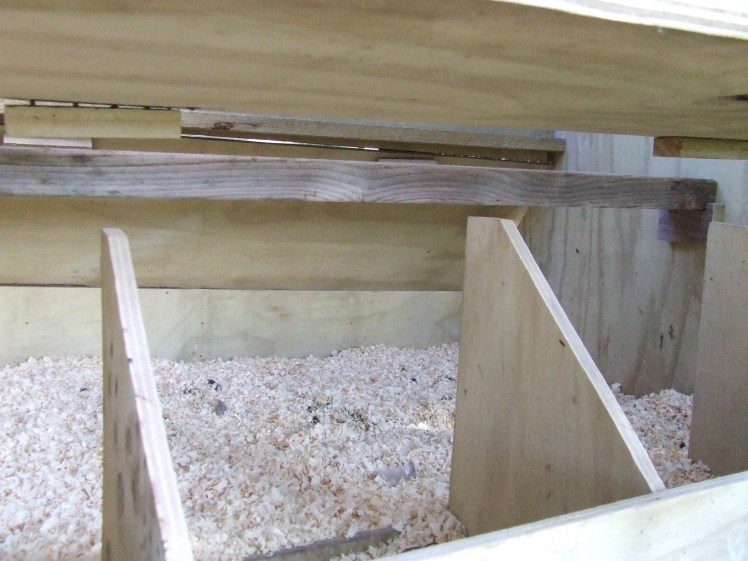
Coop Renovations
Since I can’t afford the big, walk-in chicken coop that I want at the moment, I have settled on making some little renovations to my coop, for now. There were eight nestboxes, four on each side, which was way overkill. So, I took out the dividers for the nestboxes along one side, which the hens barely ever laid in anyway, which was easily done with a little unscrewing. Now there are four nestboxes and the hens still usually want to use the same one. Not even the same one, just whichever one the other hen is in. One day I witnessed my first hen climbing incident. Kitty wanted to lay in the first nestbox where Frodo was laying. So Kitty attempted to climb onto Frodo. This didn’t work well at all considering the nestboxes are only just big enough for one hen. Frodo is also my biggest hen at around 3kg. And Kitty is my second biggest hen. It was funny. Kitty is lovely, like a calm, poofy cloud. She just sort of floofed onto Frodo. Anyway, now there is more floor space for those that sleep on the floor.
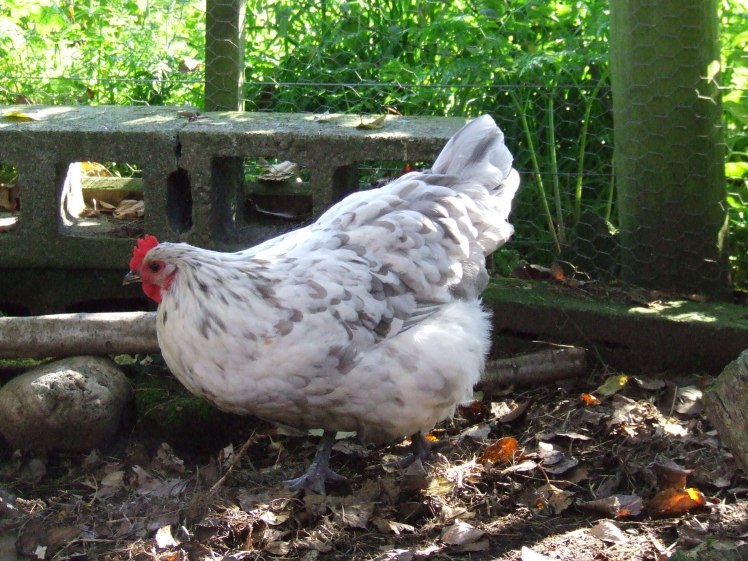


My next coop renovation was unscrewing the centre roost and replacing it with two, easily-removable roosts for more roost space and easy cleaning. First I did the main roost. I found a nice planed, rounded-edged piece of timber in the garage, measured it to fit inside the coop walls then cut it to size so that it fits quite snugly. Then I made two roost holders: one for each wall. They are pieces of wood with a slot cut out wide enough for the roost to rest in. I did it all with hand tools: measuring, sawing, chipping out the little rectangles of wood with a flat-head screwdriver and hammer, sanding and screwing. I gave all edges a light sand. This roost is wider than the old one with more rounded edges and positioned a bit higher and more to the right to allow more space for the second roost. The second roost isn’t as wide, because some of the chickens don’t like the wideness, and is low to the ground towards the non-nestbox side of the coop. I haven’t taken photos of the coop with both roosts installed, but the second roost is installed in the same way as the first, sitting on wooden holders. After I had installed just the top roost, only Lizzie and Mr Bingley were sleeping on it. Then one night I found they had some new roost buddies. Mr Bingley had the two then-little chickens beside him, one on either side. It went: Mr Collins, Mr Bingley, PB then Lizzie. It was very cute. Kitty is a big fan of the lower roost as she is the guard chicken and sits close to the door. This is a funny position that she has assigned herself. She is the last into the coop at night, although she isn’t the dominant hen, and makes noise if anything disturbing is going on.


So, what’s next on the projects list? I’m not sure what order things are going to end up getting done in, but a few things on the near horizon are:
- Making a spice shelf for the kitchen wall.
- Doing family photo frames for the lounge.
- Finding something nice to decorate our bedroom wall.
- Buying one more light for the back porch, then getting a household full of lights installed.
- Filling The Little Fulla’s sandpit with sand and sorting out a cover.
- Making a chicken tractor (a run with coop on wheels) that can be used for a breeding pen or various temporary housing needs.
- Disposing of the pruning mountain.
- Setting up pallets for growing potted plants in the alcove where the pruning mountain is.
- Building more vege beds.
The list goes on and on, in addition to other tasks like sowing and planting crops, garden maintenance and house maintenance. Never a dull moment out here! There is always something fascinating to work on.


One thought on “Small Projects Abound”